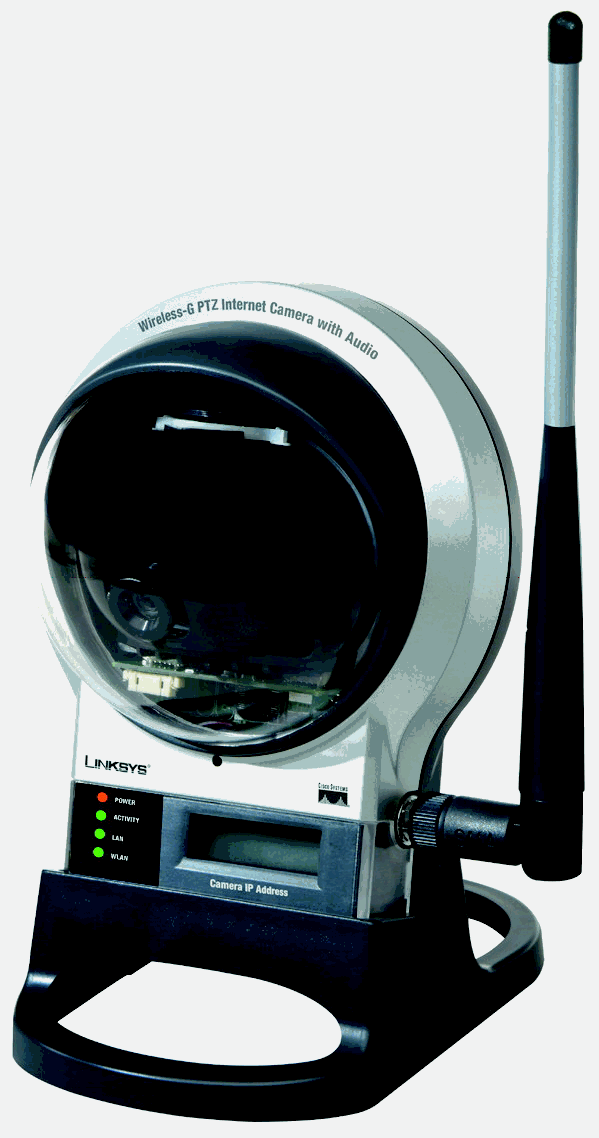
Linksys Webcam model WVC200

Flashing Linksys’ Webcam

When it comes to upgrade the internal software (firmware) of your Linksys webcam, WVC200, to the newest firmware version, be careful.
 How to do it is described by Linksys in the file WVC200_ug.pdf. You’ll get it*) via the
downloads for the camera, where you also find the new firmware to download.
 There are US and European firmware versions (currently WVC200_USA_V1.2.0R07_fw.bin and WVC200-EU_V1.2.0R03_fw.bin respectively, both sized 4.096 kByte). The difference is the language, Linksys support said. I took the EU version.
Then I did the upgrade, courageously, via wireless LAN—good, but scary.
 You go into the camera control as administrator—remember: best with Microsoft Explorer, address http://192.168.1.105 (the .105 varies with your local network, in my case I have to add the port number: http://192.168.1.105:1024; standard user "admin", password "admin"). In the blue Linksys control center you enter Setup, Maintenance (Wartung), Firmware Upgrade (Firmwareaktualisierung)and point it to the bin-file you just had downloaded. Incidentally, that’s the same place in the control center where you select the steering language—just scroll down.
 But hold it! Before you update, be sure to save the settings (Konfiguration speichern, ja nicht: »hochladen«!). A file admcfg.cfg is produced, size 4 kByte. I had to manually redo all settings after the firmware upgrade.
 Do the firmware upgrade via LAN cable, not wirelessly. At the latest, after the successful flashing process, when the camera does a full reset, you will loose connection, as in the camera all security settings for the wireless access are lost! After the correct update, I had to fetch the camera, push the small recessed reset button on the bottom, attach the camera to a LAN cable, and re-enter all settings. Luckily the IP-address had survived, thank you, router.

This is what you see when you try to access the camera wirelessly (remotely) after the automatic reset: nothing (or the rest of the picture in your browser’s cache)—reset the camera by pushbutton!

Some further tips:
• Set the picture type to MJPEG (and not to MPEG-4) if you want to see them in Apple’s Safari browser. Good for Firefox too.
• If your internet upload link is slow, reduce the max. picture frequency from 30 frames per second (to perhaps 15 f/s) or reduce the size of the picture from 640×480 pixel (= 307 Kilopixel = VGA down to 320×240, 77 kpixel). This keeps upload traffic reasonable. Local tests mislead. From the outside viewers will see no picture or just a bit of color on the top.
• Remember to open your router’s firewall, typically at Application & Gaming and DMZ (demilitarized zone), for example like this:
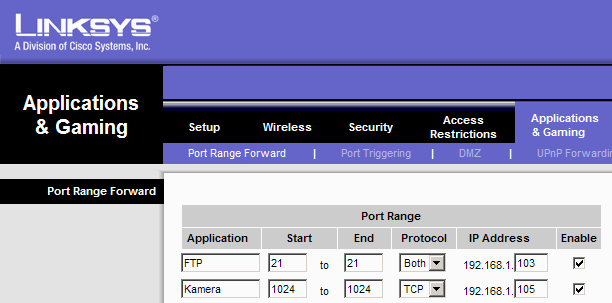
• If your computer hosts another server (like an FTP access), use the alternate access port instead of 8080 (Options, all at the bottom) like 1024.
• Do not activate
DDNS if your computer or router does that as well.
If you want to display a webcam picture on your web site, and you cannot program there—as normal—, you must ftp the pictures first to your own (running) PC, rename the picture files (they come in with vaying file names) to a single file name, and then upload this picture file to your web host. All this can be done automatically, just ask. Here an example.
• Linksys has discontinued its email support, but offers good free phone support (D: 0800-1013311 Mon-Fr 9—19, Sa 9—18) and numerous fora.
• If you loose the menu you can try to start the firmware upgrade directly via http://192.168.1.xxx/adm/upg_fw.htm. Start the upgrade with the Enter key.
• When you explain something, explain why. This description appears without any guarantee—think for yourself, and don’t do anything you don’t understand.

So far, so good, and good luck – Fritz@Joern.De. Apr. 2008

Further Tips (mostly German)—Weitere Tipps
Homepage
Zu meinem Artikel vom 22. Mai 2007 »Gute Webcam, schwache Software. Eine Überwachungskamera von Linksys sendet E-Mails mit Kurzfilm. Leider funktioniert nicht alles.« (noch mit der ersten Firmware)

*) from Linksys’ manual, Appendix C:

Upgrading Firmware

Note: Linksys recommends that you upgrade the Camera’s firmware within your network; in other words, use a computer within the Camera’s local network. If you attempt to upgrade the Camera’s firmware from a remote location—using a computer outside of the Camera’s local network—the upgrade will fail.

The Camera's firmware is upgraded through the Web-based Utility's Maintenance tab. Follow these instructions:

1. Download the firmware from Linksys’s website at www.linksys.com. Then extract the file.

2. Access the Camera’s Web-based Utility, and click the Maintenance tab.

3. On the Maintenance screen, click the Firmware Upgrade button.

4. Click the Browse button to find the extracted file, and then double-click the filename.

5. Click the Start Upgrade button, and follow the on-screen instructions. Click the Cancel button to cancel the firmware upgrade. For more information, click the Help button.